Showing posts with label photo. Show all posts

Sunday, February 3, 2013

HOW TO CREATE AND SELL PRINTS of your art/photography online


There are a couple of ways to sell prints, cards, and other products with your artwork on them.  

  1. The first thing you must have is a LARGE clean (not blury/not pixelated) image file. 
  2. To sell at physical art fairs you must fit all of the showing requirements (proper tables, tent, etc)
  3. To sell art prints online... All you need is a great high-quality image file!
ONLINE:
I belong to many online sites that will sell artprints, cards, images on T-shirts, cups, bags,... the sky is the limit on what you can find.
I particularly enjoy FineArtAmerica.com for prints. You can have an account to participate in the site for free. But it is $30. USD per year to belong and set up print sales.
With that fee you can set up your own gallery like this: http://cj-rider.artistwebsites.com
PLUS you have another gallery here on your profile like this: http://fineartamerica.com/profiles/cj-rider.html
It is a highly visible site but you are ultimately responsible for your own online and in person promotion of your works.  No guarantees- but I find it quite useful and continue to have pretty good sales there.
You can also use it to set up "events" taking place here on OA- or blog about your posts here at OA. etc. Making things come full circle back to OA! Thus helping this site grow.
If you have any questions about making hi resolution images for printing - or whatever - please ask, maybe I will know.  I have done a lot of this stuff through out my career and I am happy to share what I know.
  • Very important to use a tripod when taking art photos!  
  • Use an 8mp or better camera for larger prints
  • smaller mp cameras are ok for postcards, notecards, and other small prints.

You can google and find numerous sites to post and sell prints, cards, etc.
Redbubble, Etsy, Fine Art America, Devientart and many more - 

I have so far found Fine Art America is a well rounded and fair site. Also fairly easy to use.
However- you still have to do self promotion and get your work out there - the sites are not the "end all" to your print sales.
Anyone have any other favorites tips?
cj

http://cdn.stumble-upon.com/images/32x32_su_shadow.gif

CRITIQUE 13 geoff in oil part 2


Wow Pandora, you have been busy!!

Yes, the blue background is fine.
I see you did many updates! You are doing a great job!
The T-shirt is a nice add in!

Your flesh tones are very nice, but be careful of the dark areas that they do not become too gray-blue.

The cheek shapes are looking good and I know it took a lot of study and work to accomplish this level of detail.

Note how detail at jaw-line and chin make face appear longer and less round.


EDITS BY PANDORA:

http://cdn.stumble-upon.com/images/32x32_su_shadow.gif

CRITIQUE 13 - geoff in oil


CRITIQUE:


Coming along nicely!  
I recommend placing some preliminary lines in your drawing before painting to make sure you have your angles and features in the right position. you will continue to check these angles as you paint. See photograph as well as line across the eyes on painting. 
The left side of the face (as we are looking at the image) is good and you also have a nice cheek color there but note how that eye and eyebrow are a tad large and low.  I have made it more obvious by drawing a line across the painting and on the photo.

TIP:
tape the photo directly on your canvas - have it lined up with the painting edges maybe put it tight in a corner of the canvas so you have 2 edges lined up- now put a ruler across the eyes in the photo and that same angle should be reflected in the eyes in your painting.
 
Reflect back to the instructions for the drawing critique- note the angle of the jawline and define the shape of the chin. 
Note that the neck needs to be a tad wider on right side (as we look at the painting). 
You are doing great! just keep refining the features and watch it evolve!!  
This is a beautiful painting Pandora - it evokes much feeling in the viewer!
cj

EDITs BY ALICE:


CRITIQUE TO BE CONTINUED....
>>HERE<<


http://cdn.stumble-upon.com/images/32x32_su_shadow.gif

CRITIQUE 2 - MOOving the Cows!


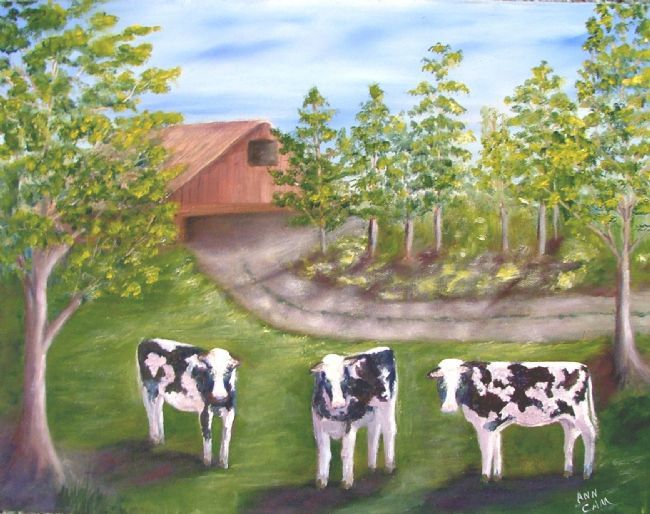
images below are copyright protected to Artist Ann Cam and are not for use other than in this post as a learning tool.

The main question artist Ann asked about this painting was concerning the placement of the cows. 
Secondly, Ann stated that she is not yet finished with the shadows.
 ORIGINAL PAINTING by Ann Cam:


The cows and the curve of the driveway tend to divide the painting into a lower and upper section.
Although I know they do pose for the camera when you walk up to take their pic,
we do not want them to feel posed in our painting. So they need some adjustment to better fit their environment.


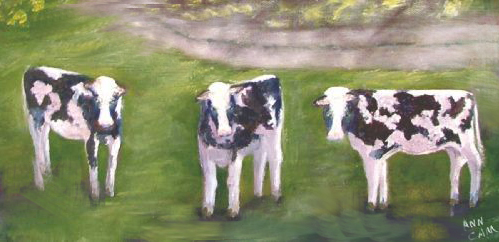
Critique solution to the placement of cows, their shadows,
barn, driveway, and tr
ee removal on right.
Image below:


 For interesting composition, create variation in size, spacing and orientation

 I moved 2 cows further to the left. The center cow's tail-end was "kissing" the driveway edge so I placed him lower in the scene. The cow on the left was raised to break through the centerline and was angled slightly so his broadside doesn't block the viewer's entry into the scene.  I would further paint that large grassy area, lighter toward center and top to further draw the eye into the painting.  Maybe put a flicking tail on the little center cow so his rear edge isn't so flat.


FURTHER THOUGHTS ON THIS PAINTING as FYI:

 This piece could be two paintings... one of cows 


and one of a barn scene which is why I brought the one cow up into the driveway as well as re-angled the driveway


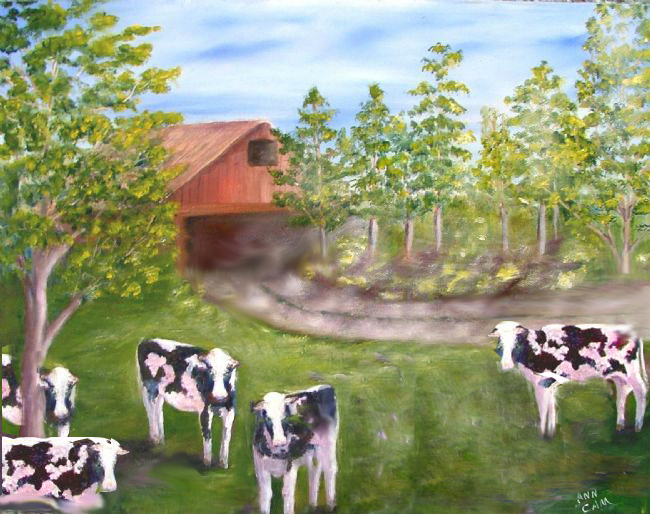
 Here is another potential solution with the addition of cows: 

Ann, I hope this info gave you some ideas on where you might place your cows, etc.

Thank you for allowing me to Critique your artwork -
Best Regards, CJ


http://cdn.stumble-upon.com/images/32x32_su_shadow.gif

CRITIQUE 14 - Beginning Landscapes- help getting started


QUESTION:
CJ, my problem is landscapes... I never really got into them.
Oils especially....any good exercises or ideas- P.S> I am not really a detail painter...sort of..also am a grad. of Ringling School of Art and design so I know quite a bit about design, comp.,
just those boring landscapes lol Help!
C 
ANSWER:
Do some research before painting landscapes for the first time or if you find you are painting boring or lifeless landscapes.

*Familiarize yourself with landscape paintings, compositions, colors, etc:
  1. Check out contemporary and old master paintings - decide what type of landscape scenes you are attracted to.
  2. Do you like more abstracted, impressionistic or photo real.
  3. Study what it is you like about your favorite landscape paintings and try to get that "wow" factor into your paintings.
*Familiarize yourself with your desired medium
  1. practice mixing the colors that you responded to in your favorite landscape paintings.
  2. after you can re-create your desired colors - it helps to paint a page of cloud like structures and use all of the colors that you selected.
    *See how they look side by side
    *See how they look slightly intermingled
    *See how they look, one glazed over another
*Practice with the paint until you have good clean color and understand how the colors interact with one another. Don't think landscape... yet.

*Any good painting begins with a good drawing. Poor composition can ruin a painting with perfect color notes. So understand good composition be it for an abstract or realistic landscape.
  1. Sketch out several thumbnails of possible compositions
  2. if you are painting from photos - have large clear photos
  3. Take many photos close up and far away.
PHOTOS For Reference:
  1. Do not slavishly paint from a photo.
  2. Remember that the camera "lies" - a black shadow in the photo has loads of detail in real life, that is, when you are actually standing there at the scene
  3. Make sure you understand what distortions the camera creates in your scene as to color, value, loss of detail, point of interest, and more
  4. Make some sketches while taking your photos
  5. Make note of what you found interesting and why you took the photo to begin with.
Click here -->>CHECK OUT THE DESERT SCENE CRITIQUE where a landscape photo was explored for a painting.

 Thanks for asking!
CJ


http://cdn.stumble-upon.com/images/32x32_su_shadow.gif

CRITIQUE 1 - desert scene - composition


images are copyright protected to the individual and are not for use other than in this post as a learning tool.


Desert Scene:  Working out a composition


(above) Original Photo of desert area with wheel dominating the scene. Wall blocks viewers eye from easily passing through to the upper portion of the scene.


Artist would like to paint this historic scene and does not have the opportunity to re-shoot image - So here are a couple of options in keeping with the integrity of the sceen.


This artist only inquired about composition for this critique session


http://cdn.stumble-upon.com/images/32x32_su_shadow.gif

HOW TO CREATE AND SELL PRINTS of your art/photography online


There are a couple of ways to sell prints, cards, and other products with your artwork on them.  

  1. The first thing you must have is a LARGE clean (not blury/not pixelated) image file. 
  2. To sell at physical art fairs you must fit all of the showing requirements (proper tables, tent, etc)
  3. To sell art prints online... All you need is a great high-quality image file!

ONLINE:

I belong to many online sites that will sell artprints, cards, images on T-shirts, cups, bags,... the sky is the limit on what you can find.

I particularly enjoy FineArtAmerica.com for prints. You can have an account to participate in the site for free. But it is $30. USD per year to belong and set up print sales.

With that fee you can set up your own gallery like this: http://cj-rider.artistwebsites.com

PLUS you have another gallery here on your profile like this: http://fineartamerica.com/profiles/cj-rider.html

It is a highly visible site but you are ultimately responsible for your own online and in person promotion of your works.  No guarantees- but I find it quite useful and continue to have pretty good sales there.

You can also use it to set up "events" taking place here on OA- or blog about your posts here at OA. etc. Making things come full circle back to OA! Thus helping this site grow.

If you have any questions about making hi resolution images for printing - or whatever - please ask, maybe I will know.  I have done a lot of this stuff through out my career and I am happy to share what I know.

  • Very important to use a tripod when taking art photos!  
  • Use an 8mp or better camera for larger prints
  • smaller mp cameras are ok for postcards, notecards, and other small prints.


You can google and find numerous sites to post and sell prints, cards, etc.
Redbubble, Etsy, Fine Art America, Devientart and many more - 

I have so far found Fine Art America is a well rounded and fair site. Also fairly easy to use.

However- you still have to do self promotion and get your work out there - the sites are not the "end all" to your print sales.

Anyone have any other favorites tips?

cj

http://cdn.stumble-upon.com/images/32x32_su_shadow.gif

Watermark, Copyright mark, opaque and transparent words


Watermark, Copyright mark, opaque and transparent words
create one of the below options on an image. OR create a new file with just your watermark and save it to a safe place on your computer.  Then, when you have another artwork to label, just open the image and the watermark file, copy the watermark file then paste it on the image, adjust placement and then on to the next image.

OPAQUE Watermark:
No frills opaque signature/watermark for your images in Photoshop cs2

  1. Open image
  2. Select type tool
  3. Select type color, size, style
  4. click mouse on face of image and drag to desired size
  5. type copyright symbol [ALT]+ 0169 and artist name
  6. move to desired position on image


TRANSPARENT, etc.  Watermark:
Make transparent signature/watermark
1. On open image, select the type tool and black type color.
2. click on image and drag to create type/text box.
3. Type the Copyright symbol using [ALT]+ 0169, then type artist name.
4. Highlight the text and scroll through the fonts and font size to pick desired style.
5. Move the text block to desired position.
6. Across the top of the screen click "layers" then click "layer styles"
7. Change the text "layers" Blending options and click "LIGHTEN" (text will disappear).
8. Click on the layer "style" icon at bottom of palette and select drop shadow. The text will reappear transparent within outline shadows.
9. Experiment by adding other blending style options: emboss, glow, etc. for other effects.

Below are some examples on an image of several of the items described above.
cj rider watermark


WHY PROTECT YOUR IMAGES?

http://cdn.stumble-upon.com/images/32x32_su_shadow.gif

Sunday, February 3, 2008

Orphaned Images


Did you know your images can become lost on the internet and then be scooped up by some stock photo sites or similar entities?

 Or simply used by anyone because they appear to have no owner... i.e. "Orphaned photos"

 You may think no one would want your art pics, family images or snapshots of your vacation, etc. but that is not always true.

 Search engines pick up everything posted on the internet - photos, blogs, whatever. 
Blog entries usually come with your name attached - but photos may come to search engines as what is called "orphaned photos"

  What is this and why should you care?
Ever do a google search and find random images that appear to no longer have an owner but they are posted on numerous sites?
 Even maybe on pinterest or on FB after they have been shared to the nth degree?

 Photo images especially are being ripped out of context all the time.
You may not care until you wonder if your family vacation photos are being used/sold.
 What about that sweet image of your precious pet, child or grandchild.

 You can protect yourself (a little) by placing a watermark or copyright statement on every image before you post it.

Yes, it seems like a bother - and only you can decide how important it is to keep your photos attributed to YOU!

 This is a huge issue for professional photographers but it also trickles down to occasional users and bloggers who post personal or family photos.

 Here is an article to create a simple copyright or watermark image for your individual jpgs. LINK: Create Watermarks / Copyright

http://cdn.stumble-upon.com/images/32x32_su_shadow.gif